Baby Wrap-Cardigan
Free online knitting pattern

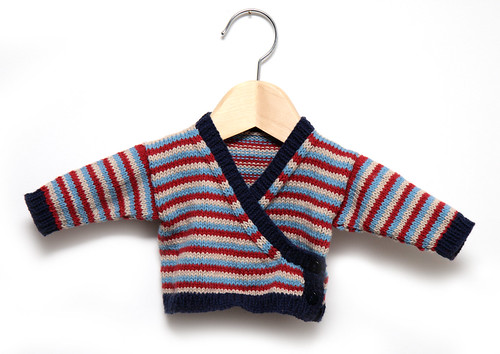
Baby wrap cardigan in stripes
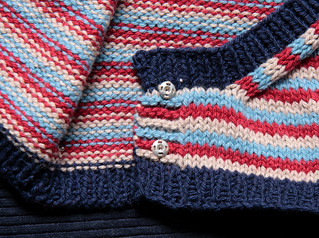
A seamless baby wrap-cardigan in DK weight cotton, with contrast edging, buttons and hidden press-stud fastenings. The body is knitted in one piece with the sleeves knitted onto the armholes in-the-round.
I wanted to create a garment for a friend’s new baby boy that would be comfy and easy to get on and off. There are plenty of cardigan patterns for baby girls, but I couldn’t find anything that would suit a baby boy so I decided to create one. I chose easy-to-care-for cotton. But, as cotton can be stiff around the seams, I opted for seam-free construction.
The sleeves are knit on a circular needle using the magic loop technique, double-pointed needles could also be used. Shoulder sections are joined using the three-needle cast-off (that’s ‘bind-off’ to US English speakers). This technique is a bit fiddly but well worth it for softer, flatter seams. This pattern also uses the basic intarsia technique to join areas worked in different colours.
The sample shown is striped but the instructions are for a single colour with contrast edging.

Schematic
Size information
The sizes are based on the standard baby measurements on Yarn Standards, but I have modified the proportions, reducing widths slightly, based on feedback from parents. If in doubt, measure the baby! Choose the size closest to the baby’s body circumference and add or reduce rows at the suggested point to obtain the desired length.
| Approx. age | months | 0-3 | (3-6 | 6-12 | 12-18) |
|---|---|---|---|---|---|
| Chest circumference | inches | 14 | (16 | 18 | 19) |
| cm | 36 | (41 | 46 | 48) | |
| Garment width (a) | inches | 9.5 | (10.5 | 11.5 | 12) |
| cm | 24 | (27 | 29 | 30) | |
| Garment length (b) | inches | 9 | (10 | 10.5 | 11) |
| cm | 23 | (25 | 27 | 28) | |
| Sleeve length (c) | inches | 5.5 | (6.5 | 7.5 | 8.5) |
| cm | 14 | (16.5 | 19 | 22) |
Requirements
Yarn & notions
- 2 (3, 3, 3) x 50 g balls Rowan Milk Cotton for main colour (MC)
- 1 x 50 g ball Rowan Milk Cotton for contrast colour (CC)
- 2 x 1 cm (2/5 inch) buttons
- 2 small press studs
Needles & equipment
- 3.5 mm circular needle
- 4 mm circular needle
- Extra 4 mm needle for three-needle cast-off
- 3 x stitch holders or scrap yarn
- 2 x removable stitch markers
Tension/gauge
22 sts and 30 rows over 10 cm (4 in.) square in stocking stitch
Instructions
Body

Baby wrap cardigan
With 3.5 mm circular needle, CO 156 (174, 189, 198) sts in CC
Next row (rs): [K1, p1] to end (work an extra p1 on third size)
Work 5 further rows in 1 x 1 rib, ending with a ws row
Change to 4 mm circular needle
Row 1 (rs): Using CC, rib 5 sts, change to MC, k to end
Row 2 (ws): K5, p to last 5 sts, change to CC, bringing CC up underneath MC to prevent a gap forming (intarsia technique), rib 5 sts
Be sure to use the intarsia technique in subsequent rows when changing between MC and CC
Next row (rs buttonhole row): K1, p1, k1, yo, k2tog, k1, change to MC, k to end
Next row (ws): as row 2
Continue working rows 1 & 2 until work measures 6.5 (7.5, 7.5, 9) cm / 2.5 (3, 3, 3.5) in., ending with a ws row. Add or reduce rows here in order to achieve desired garment length.
Shape front slopes
Next row (rs): Work 11 (13, 14, 15) sts, transfer these sts to a stitch holder or scrap yarn, work 41 (45, 49, 51) sts, place marker, work 52 (58, 63, 66) sts, place marker, work to end
Next row (ws): Work 11 (13, 14, 15) sts, transfer these sts to a stitch holder or scrap yarn, work to end. 134 (148, 161, 168) sts
Next row (rs dec): K1, sl1, k1, psso, k to last 3 sts, k2tog, k1
Next row (ws dec): P1, p2tog, p to last 3 sts, p2tog tbl, p1
Repeat these 2 rows 3 times more. 118 (132, 145, 152) sts
Continue, decreassing on rs only, until work measures 13 (14, 14.5, 15) cm/5 (5.5, 5.75, 6) in.
Seperate front right
Next row (rs): Work rs decrease, knit to marker, turn
Work these sts only, decreasing at start each rs row as before, until 13 (15, 17, 18) sts
Continue without shaping until work measures 23 (25, 27, 28) cm / 9 (10, 10.5, 11) in. from cast-on edge, ending with a ws row
Leave remaining sts on the needle for later three-needle cast-off
Back
With rs facing, rejoin yarn at back right armhole
Work to second marker, turn. Working on these 52 (58, 63, 66) sts only, continue in stocking stitch until work measures 23 (25, 27, 28) cm / 9 (10, 10.5, 11) in., ending with a rs row.
Next row: P13 (15, 17, 18), transfer next 26 (28, 29, 30) sts to a stitch holder or scrap yarn, p remaining 13 (15, 17, 18) sts
Join right front and right back shoulder seams using three-needle cast-off technique
Left front
With rs facing, rejoin yarn at left armhole, k to last 3 sts, k2tog, k1
Next row (ws): Purl
Continue decreasing this way until 13 (15, 17, 18) sts
Continue without shaping until work measures 23 (25, 27, 28) cm / 9 (10, 10.5, 11) in., ending with a rs row
Join left front and left back shoulder seams using three-needle cast-off technique
Sleeves (both alike)
Using 4 mm nedle, with rs facing, starting at armhole, pick-up-and-knit 23 (25, 27, 28) sts to shoulder seam, turn, pick up 23 (25, 27, 28) sts to armhole (picking up approx 3 sts for every 4 rows). 46 (50, 54, 56) sts
Join to work in the round using magic loop technique
Knit 3 (3, 4, 4) rounds
Next row (dec): K1, k2tog, k to last 3 sts, sl1, k1, psso, k1
Continue in stocking stitch, working a decrease row every 3rd (3rd, 4th, 4th) row until 28 (28, 32, 32) sts
Continue without shaping until sleeve measures 11 (14, 17, 19) cm / 4.5 (5.5, 6.5, 7.5) in.
Change to 3.5 mm needle
Using CC, [k1, p1] to end
Work a further 5 rows in 1 x 1 rib
Cast off loosely in rib
Body ribbing
Transfer 11 (13, 14, 15) sts of left edge of right front from stitch holder to 3.5 mm needle
With rs facing, join CC at outer edge and knit the 11 (13, 14, 15) transferred sts
Pick-up-and-knit 1 sts for every row along right front slope to shoulder
Transfer back neck sts from stitch holder and knit these sts
Pick-up-and-knit 1 st for every row along left front slope
Transfer remaining 11 (13, 14, 15) sts of right edge of left front slope from stitch holder and knit these sts
Count sts to check whether you have an odd or even number
Next row (ws): Purl, working a single decrease at centre back neck if necessary to ensure an odd number of sts
Next row (rs buttonhole row): K1, p1, k1, yo, k2tog, [k1, p1] to last st, k1
Next row (ws): [P1, k1] to last st, p1
Next row (rs): [K1, p1] to last st, k1
Next row (ws): [P1, k1] to last st, p1

Hidden inner fastening with press studs
Repeat the last 2 rows once more
Cast off in rib
Finishing
Sew on buttons
Sew on press-studs to fasten garter stitch edge of left front to inside of right front, taking care to make stitches invisible from the right side of right front.

SUPERB!
Congratulations!
Really nice pattern
I am knitting this in Patons Grace cotton using Azure and Ginger colours !
Thank you for sharing your pattern